
How to Install Kali Linux, Complete and Latest, Definitely 100% Successful
The Latest and Complete Way to Install Kali Linux, how to install kali linux, how to use kali linux
Penulis
---

Hello Javatpoint friends, see you again on the same blog, on this occasion Mimin will share tips and tutorials How to Install Kali Linux, Complete and Latest, Definitely 100% Successful.
The Latest and Complete Way to Install Kali Linux, how to install kali linux, how to use kali linux, how to boot kali linux from usb on windows 10.
To install Kali Linux, you must pay attention to the requirements or specifications of the computer you will use. So that the installation process is successful and successful.
So, what is your reason for installing Kali Linux, of course you want to become an expert in the field of security, right? Therefore, I suggest you read the article about the differences between hackers and crackers, so that you can first understand the purpose of installing Kali Linux.
And here is a review of the computer requirements and specifications needed.
Kali Linux Installation Requirements
Installing Kali Linux on your computer is easy. First you need compatible computer hardware. Kali Linux is supported on i386, amd64, and ARM (both armel and armhf) platforms. The minimum hardware requirements are as listed below.
Installation Prerequisites
- Minimum disk space of 20 GB for Kali Linux installation.
- Ram for i386 and amd64 architectures, minimum 1GB, and Code Guide recommends 2 GB or more.
- Has CD-DVD Drive or USB Boot support.
Preparing to Install Kali Linux
There are several steps to preparing to install Kali Linux, below are the preparatory steps for installing the latest Kali Linux.
Download the Latest Kali Linux
The most important thing is of course the Kali Linux ISO file, you can download it on the official Kali Org Download site.
After you have finished downloading the ISO file, then create a Kali Linux Boottable using a USB (Flashdisk) to make it easier. To make a boottable, follow the following guide, so that you don't make a mistake in making a boottable, if you make a mistake the risk is that your USB (Flashdisk) will be damaged.
How to Make a Kali Linux Boottable
- To create a Boottable Kali Lnux you can use the help of an application called Rufus, you download the application first.
- After the download is complete, then insert your flash disk into your computer's USB slot, and run the Rufus application.
- Then click SELECT and later you will be asked to select the ISO file that was downloaded earlier. For example, you can see the picture above.
- Also look at your partition scheme type, adjust it to your computer's bios type, whether MBR or GPT.
- Also set the file system to FAT32, and for other settings, leave it at default.
- If you have clicked START, and if a notification or warning appears, just click OK.
- Then a display like the image below will appear, you select write in DD image mode then ok.
- After that, another notification will appear in the form of a notification that all the data on your flash disk will be deleted, so I suggest you back up the data on your flash disk first before cleaning it, if you have, click OK.
- Wait for the process to complete for approximately 15 minutes.
- When you are finished, click close.
So now you have a Kali Linux bootable flash disk, and the next step is to back up your computer data for backup if you make a mistake at the partition division stage later.
And if you want to dual boot, then you have to divide or create a new partition of at least 20GB for you to install Kali Linux.
That's how to make a Kali Linux boottable.
Don't forget to also prepare your mouse, because during the installation process your touchpad will be disabled.
And what is no less important is to make sure you have an internet connection, to prevent unwanted things.
Now all the preparations are complete, and then you can start installing Kali Linux on your computer. For a guide on how to install Kali Linux, see the review below.
How to Install the Latest and Complete Kali Linux from JavaTpoint
1. Enter the computer bios
The first step to install Kal Linux is to enter the bios menu on your computer, and the method is very easy, you insert the bootable flash disk into your computer's USB slot, after that you restart or shutdown your computer first, then when your computer starts to turn on Again, immediately press the F2 or F10 key, just adjust it to your computer, because each computer has different BIOS settings according to its type.
2. Boot Menu Settings
After entering the bios, then select Boot Menu and set the placement of your flashdisk to the top as the boottable then save by pressing the f10 key.
3. Enter the Kali Linux Boot View

Then your computer will restart automatically and immediately enter the Kali Linux boot screen, see the image below.
4. Select Graphical Install
Just choose Graphical Install because it's easier and doesn't take too long.
5. Select Kali Linux Language

Select the language you will use for Kali Linux and then specify your country location. And you also have to configure your keyboard with the keymap that suits you.
6. Determine Geographic Location

Determine the geographic location where you live.
7. Select Kali Linux Keymap

Just choose the default, namely American English, because we don't use a Chinese or Arabic keyboard.
8. Kali Linux Installation Process
The installation process will copy the files to your hard disk, probe the network interface, and then ask you to enter the hostname for the Kali Linux system on your computer.
9. Fill in the Kali Linux Host Name

In this guide GUIDE.COM enters the Kali host name.
10. Fill in the Kali Linux Network Domain

Next, you can fill in the default domain name to be used on this system. And the code.com guide is filled with localdomain because the Kali Linux installation process is carried out on localhost.
11. Fill in your full name
Your full name will be used as your own computer user data.
12. Fill in the Kali Linux Non Root Username
Then fill in the username for non-root users on the Kali Linux system, the username is up to you.
13. Fill in your Kali Linux password
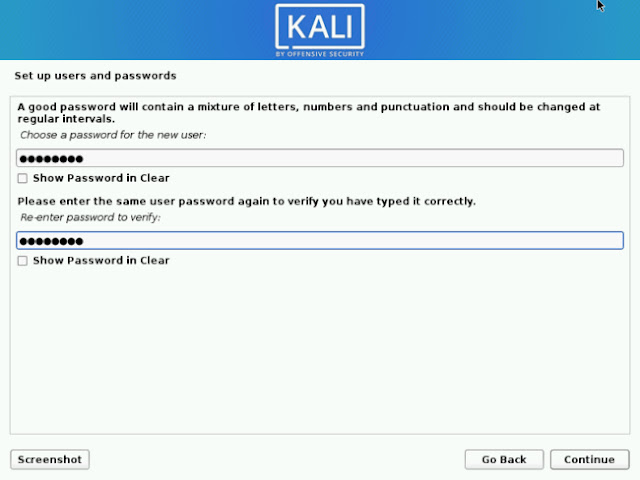
You can create a password for your Kali Linux as you wish, and remember not to forget the password.
14. Set Time Zone
Also set your time zone, to determine the clock that will appear on your Kali Linux later.
15. Kali Linux Hard Disk Partition Process

The system will now investigate your disk and offer four options. As shown in the image below, GUIDE.COM uses all the disks on the GUICODE.COM computer and does not configure LVM or Logical Volume Management, so you choose the first one, namely Guided - use entire disk
16. Select the hard disk that will be used
Next, you select the hard disk that you want to partition. At this stage depending on your own needs, you can choose to save all files in one partition by default.
If your computer only has one hard disk then one option will appear, but if your computer has several hard disks several options will appear as well.
17. Select the Partition Setting Type

After that you will only have one last chance to review your disk configuration, before the system installer makes irreversible changes. For those of you who are still beginners, GUIDE.com recommends following the image below. If you have clicked Continue, the installation system will run and you will have an almost complete installation.
18. Confirm the Kali Linux installation process on the hard disk
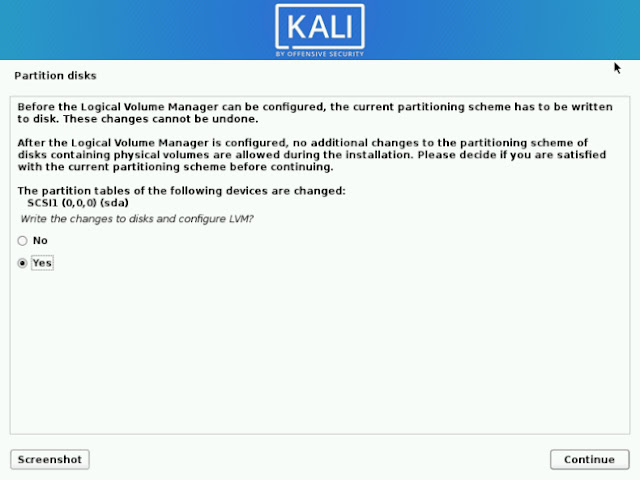
Then you will be asked to choose the network configuration whether you want to mirror it or not. Kali Linux uses a central repository to distribute applications. And you must enter the appropriate proxy information as required.
And if you chose LVM, you can set the size of the group that will be created for the Kali Linux installation.
Then Save the changes you set to your Kali Linux.
19. Kali Linux Installation Process
20. Kali Linux Proxy Server
At this stage you just leave everything at default so you don't need to fill in the Kali Linux Proxy Server.
21. Configure apt Kali Linux

22. Select the Kali Linux Application Package
This stage is the stage that differentiates Kali Linux 2020.1 or old Kali Linux, because this stage is only available on Kali Linux 2020.1 and above.
The Kali Linux application package provided is very complete, but for those of you who are still beginners, don't choose all of them.
Because you don't understand all the functions of the application and it will only make the installation process longer and make the Linux you install on your computer heavier.
So the advice from GUINODE.COM is to leave the default as in the image below.
23. Install the Kali Linux Grub Loader
Then install grub so that later you can enter Kali Linux.
24. Choose where you will install the Kali Linux grub loader
25. The Latest Kali Linux Installation Process is Complete

After you have finished installing Grub, finally there is only one step left to complete the Kali Linux installation, see the image below and click the continue button to reboot or restart your computer to enter the Kali Linux that you have installed.
That's the end of the guide on how to install the latest and most complete Kali Linux from the preparation stage, creating the boottable, to the installation process.
That's it from javatpoint.biz.id, hopefully what is conveyed can be useful for your learning. Greetings semicolon.
So maybe you also need the best VPN application on iOS and Android, why does the code guide say you need it?
The reason is that when you search on Google about Kali Linux what will appear are global search results not only from Indonesia and if you can use English when searching.
And you might also be interested in JavaTPoint Blog which discusses business and technology, just like Javatpoint which always updates technology.

Post a Comment
Post a Comment